Chest Tube Thoracostomy
Background:
- The insertion and placement of a chest tube into the pleural cavity for the purpose of removing air, blood, purulent drainage, or other bodily fluid foreign to this space and to restore the mechanical function of the lung.
- If a patient with pneumothorax or other indication for tube thoracostomy requires intubation and mechanical ventilation, the chest tube should be inserted first to avoid creating an iatrogenic tension pneumothorax.
- The images and information provided below explain the process of preparing for and the placement of the chest tube (tube thoracostomy).
Editors:
- Anthony J. Busti, MD, PharmD, FNLA, FAHA
- Jeremiah Hinson, MD, PhD
Procedure: Chest Tube Placement
|
|---|
- Chylothorax
- Empyema
- Hemopneumothorax
- Hemothorax
- Pleural effusion with symptoms and signs of instability
- Pneumothorax (Symptomatic or simple but beyond 25%)
- Iatrogenic pneumothorax (e.g., post needle decompression for tension pneumothorax)
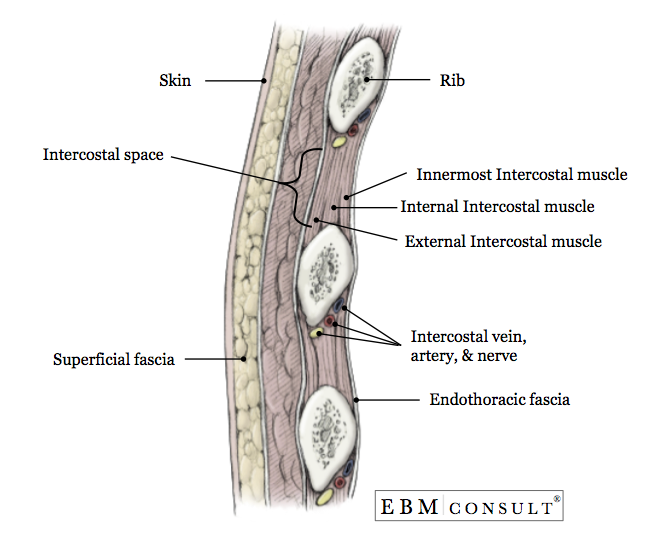
- 5th intercostal space at the midaxillary line (note: in most patients this is lateral to the nipple at the point of the midaxillary line)
- Considerations & Special Circumstances:
- Avoid placement directly over an area of infected soft tissue (e.g., cellulitis or skin abscess)
- Avoid going below or through the diaphragm, which can extend up as high as the nipple during full expiration
- Consider going into the 4th intercoastal space at the midaxillary line in patients who are pregnant, have ascites from cirrhosis, or large hemoperitenum where the increased intraabdominal contents and pressure can further elevate the diaphragm
- Chest tube tray (that includes Kelly clamps x 2 and forceps x 1)
- Sterile gloves, gown, hair covering, drapes and towels
- Chest tube (size is influenced by the reason for placement)
- Adults:
- 36 - 38 F for large pneumothorax or hemothorax
- 24 - 32 F for simple/nontraumatic pneumothorax
- Pediatrics:
- Based on Broselow tape but ranges 12 - 28 F for children and 12 - 18 F for infants
- Note: Consider having a back up chest tube available one size smaller to avoid delays
- Pleurivac system (or alternative suction device with reservoir) and connection tubing
- Betadine or chlorhexidine skin cleansing preparation
- Scalpel #10 blade and handle
- Nonabsorbable suture (e.g., 1-0 or 2-0 silk)
- Xeroform or Vaseline gauze dressing
- Sterile 4" x 4" bandages with slits
- Elastoplast dressing roll
- Adhesive tape
- 20-guage and 25-gauge needle with 10 ml syringe
- Local anesthetic (e.g., 1 - 2% lidocaine with or without epinephrine)
- Parenteral analgesia and/or sedative hypnotic
- Explain the procedure to the patient and obtain informed consent if not emergent
- Place the patient on the cardiac monitor, pulse oximetry and supplemental oxygen
- Ensure 2 points of functioning intravenous (IV) access with 2 large bore (16 - 18 G) catheters.
- Determine the right position for the patient:
- Lying in the supine position:
- Least preferred
- Used when the patient is hemodynamically unstable
- Sitting in the supine position:
- Preferred if stable.
- Head of bed elevated to 30 degrees
- Regardless if the patient is sitting up or lying down, the patients arm on the side of the chest tube placement should be abducted and flexed at the elbow with hand up above the head to expose the area of insertion
- Identify the anatomical landmark to giving consideration to special circumstance
- Set up the Pleurivac system by injecting water to create the water seal (per manufacturer), then attach to high-volume suction capable of creating at least 60 cm of water pressure at a flow of at least 15 - 20 L/min
- Verify all supplies required for chest tube insertion are
present at bedside and prepared
- Initiate procedural sedation and/or injection of local anesthetic for intercostal nerve block (described in detail below)
- Put on the hair covering, sterile gown and gloves
- Prepare chest tube by placing a Kelly clamp across the end of the chest tube that will enter into the chest cavity and place forceps across the opposite end to prevent fluid from the pleural cavity from escaping freely after the chest tube is in place.
- Note: Kelly clamp should be placed with the metal tip compressing the chest tube but not extending beyond, as the free end of the Kelly clamp could result in tissue damage to the lung on insertion into the chest cavity.
- Begin procedural sedation and parenteral analgesia based on clinical situation
- Clean the area of skin with topical antiseptic
- Drape the area using sterile technique
- At the 6th rib and intercostal space, anesthetize the skin at insertion point in an area of about 4 cm going down to the periosteum of the rib under the incision. Then anesthetize the subcutaneous tissue along the tract to the 4th or 5th intercostal space.
- Note: Starting 1 rib and intercostal space below the entry into the chest cavity (just above the 5th intercostal space) allows the tube to tunnel beneath subcutaneous tissue and reduces the chance of air leak, especially at the time of chest tube removal.
- Anesthetize the pleura in the area of the 4th or 5th intercostal space
- Note: It is important to anesthetize the pleura well due to the amount of pain in this area when entering into the chest cavity.
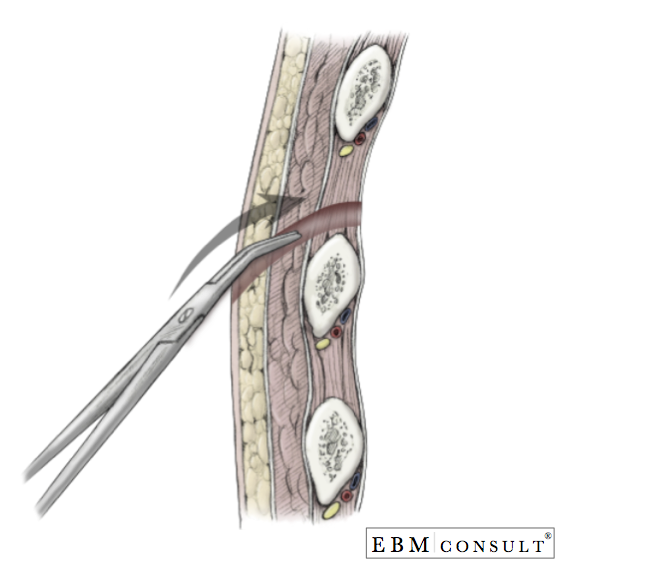
- Make an incision over the 6th rib surface that is about 2 - 3 cm and extends down into the subcutaneous tissue.
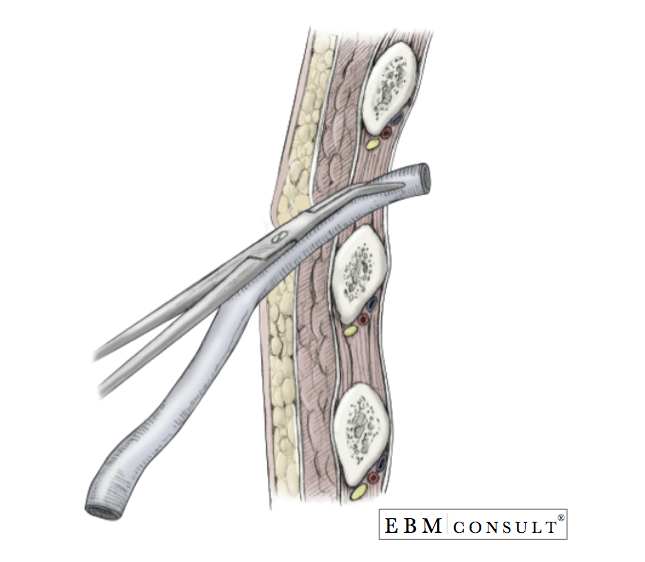
- With controlled effort, dissect bluntly with a Kelly clamp to the surface of the 5th or 6th rib and continue to dissect bluntly through the underlying subcutaneous tissue muscle, creating a track the extends over the top of the 4th or 5th rib (1 rib superior to your site of skin entry) and into the intercostal space. Note: Going over the top of the rib avoids injuring the neurovascular bundle that is present underneath the inner aspect of the rib.
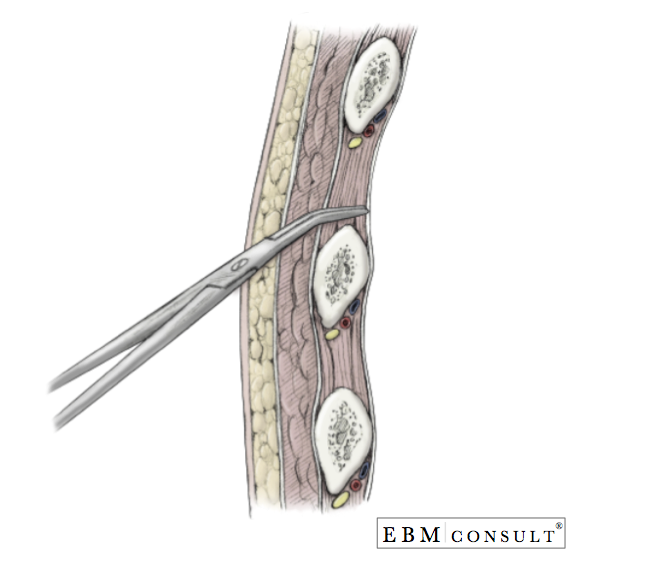
- Once the intercostal muscles have been adequately dissected and the pleura reached, hold the closed Kelly clamp with a grip close to the end of the metal tips, and in a controlled effort, puncture through the pleura.
- Note: Avoid losing control of the Kelly clamp upon entering into the chest cavity to avoid puncturing the lung and creating a hole. Doing this could create an air leak due to air moving into the lung alveoli but moving into the chest cavity and then taken out by the chest tube.
- Once inside the chest cavity, with the tip of the Kelly clamp near the plane of the pleura, open the Kelly clamp to stretch the tissue larger than the size of the chest tube.
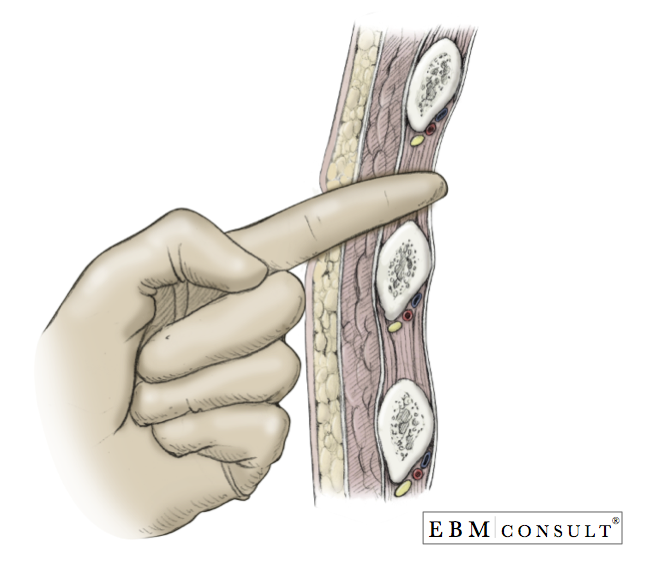
- With the Kelly clamp still inside the chest cavity, insert your index finger into the hole to keep the track open and take out the Kelly clamp.
- Using the index finger, sweep the inside of the chest cavity feeling for adhesions and to make sure you are in the intrathoracic cavity and not in the intraperitoneal cavity. Do not take your index finger out if you are in the right location.
- Note: You should NOT feel the diaphragm in the cephalad direction, the liver (if on the right side) or the spleen (if on the left side). If you have punctured through the diaphragm, it will need to be repaired surgically. If you feel a significant amount of adhesions then another location will be needed since it can be difficult to appropriately insert the chest tube in a posterior - superior (apically) direction.
- While keeping your index finger in the chest cavity, take the chest tube with the Kelly clamp and forceps still in place with your other hand and advance the tip of the chest tube along your index finger to ensure you enter into the intrathoracic cavity.
- Once you have verified the chest tube in the right place, remove the Kelly clamp and advance the tube further in a posterior direction and up towards the apex (superior aspect) of the lung until all of the holes on the chest tube inside the chest cavity.
- Note: It is important to ensure that the chest tube is advanced far enough that all drain holes are within the thoracic cavity.
- Take out your index finger and now release the forceps attached the end of the chest tube and immediately connect the end of the chest tube quickly to the Pleurovac that is under water seal and set at negative 20 cm of H2O so that the lung can be re-expanded.
- Secure the chest tube with suture to the skin.
- Note: There are a number of techniques to suture the chest tube to the skin. However, the technique used should be able prevent inadvertent removal of the chest tube or exposure of the holes in the chest tube, be so tight around the chest tube as to clamp off the chest tube, or be too tight on the skin that the skin around the chest tube insertion site does not start to have decreased blood flow.
- Apply antibiotic ointment around the insertion point and then apply an occlusive dressing (Xeroform or Vaseline gauze) over the chest tube insert site to create a seal.
- Apply two or four of the 4 x 4-inch dressings via the slits so that the chest tube is in the center of the bandages and tape down the dressing and tube to the skin.
- Note: Many clinicians will apply adhesive tape to the patient and then wrap the tape in a spiral fashion or enveloped around the tube a few centimeters to create another anchor of the chest tube to the patient.
- Apply the Elastoplast dressing tape over the dressing and bandages to secure them to the patient and help to maintain the seal around the insertion site.
- Note: Some clinicians will tape the connections to the suction tubing to help ensure that the suction is not accidentally separated from the chest tube or creates an air leak.
- Repeat vital signs including pulse oximetry
- Listen to bilateral lung sounds
- Obtain a portable chest radiograph to verify lung reexpansion and placement of the chest tube
- Evaluate the activity of the Pleurovac to look for continued signs of an air leak and/or the amount of blood or fluid being evacuated
- Reasons for persistent air leaks or failure of the ling re-expansion:
- A connection in the tubing is loose or not tight
- Hole in the tubing
- One of the holes in the chest tube is now exposed
- A bronchopleural fistula is present
- Esophageal rupture
- Intraparenchyemal fistula from injury of the lung by the Kelly clamp or chest tube.
- Inserting the chest tube within a fissure of the lung
- Damage to the neurovascular bundle underneath the rib from using the wrong technique
- Pulmonary edema secondary to lung re-expansion
- Tension pneumothorax from an occluded or clamped tube
- Persistent pneumothorax
- Subcutaneous emphysema
- Injury to the diaphragm
- Placement into the peritoneum
- Infection (specially pneumonia)
- Bleeding from the chest wall (due to injury of the intercoastal artery)
- EBM Focused Topic: Chlorhexidine vs Betadine on Prevention of Surgical Site Infections
- Procedures: Seldinger Technique for Placement of Central IV Lines
- Procedures: Lumbar Puncture
Indications
Anatomical Placement
Supplies
Pre-Procedure Preparation

Procedure: Placement of Chest Tube
Post-Procedure Assessment
Complications
Other EBM Consult Related Content
MESH Terms & Keywords
|
|---|
|