Seldinger Technique for Intravenous (IV) Line Placement
Summary:
- The Seldinger technique is the most common method used when placing a central intravenous (IV) line
- The Seldinger technique can be used when placing central IV lines in the following locations:
- Internal jugular vein
- Subclavian vein
- Femoral vein
- PICC line or ultrasound guided IV into a deeper vein
- It is also commonly a technique used in placement of an arterial line (a-line) in the radial or femoral artery when continuous blood pressure monitoring is needed.
- Correct implementation of the Seldinger technique and in the following order has not resulted in any known evidence of complications as it relates to the guide wire or venous catheter.
- Note: Some clinicians will claim that using a scalpel to enlarge the puncture site along the guide wire could potentially result in cutting the wire, but tour knowledge there are no published reports or studies of this to validate that claim.
Procedure: Seldinger Technique
|
|---|
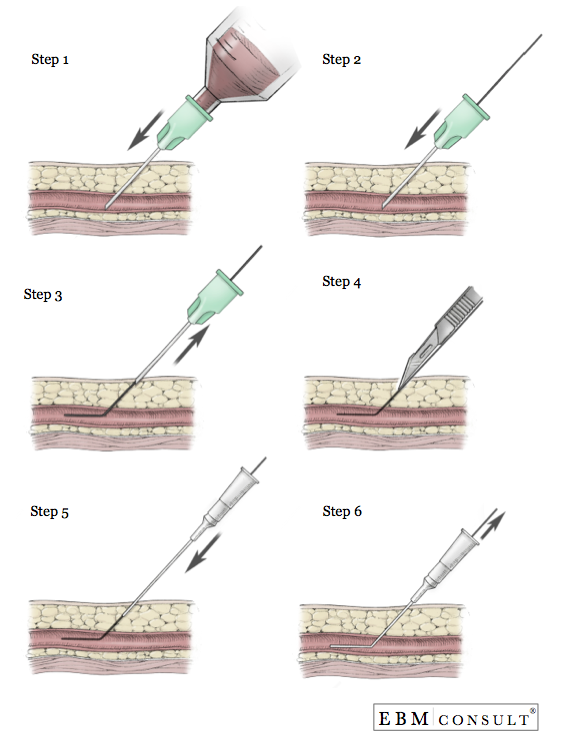
- Step 1:
- Align the bevel of the needle with the numbers on the syringe so that you know the location of the bevel once inside the tissue
- Enter the skin at approximately a 45 degree angle
- Once the needle has been introduced through the skin, begin applying suction or negative pressure by pulling back on the plunger of the syringe
- Once blood starts to enter into the syringe, stop advancing the needle
- Hold or stabilize the needle in place with your non-dominant hand and then remove the syringe.
- If you are doing venous line placement, the blood coming out of the hub of the needle should not be pulsating or bright red as that would be concerning for placement into an artery.
- Using the same hand that is stabilizing the needle in place, place the thumb over the hub to prevent both blood loss as well as prevent air from entering into the needle and creating an air embolism if negative pressure is created.
- Note:
- Step 1 assumes that the skin was properly cleaned based on protocols approved by the institution.
- Step 2:
- While stabilizing the needle in place, insert the guide wire into the hub of the needle and advance the guide wire. The length of advancement of the guide wire is based on the anatomical location and type of IV line being placed.
- You should not feel resistance while trying to advance the guide wire. Reasons for resistance can include no longer being inside the lumen of the blood vessel, dissection of the blood vessel wall by the guide wire, the presence of a thrombus.
- If resistance occurs stop the procedure and pull both needle and guide wire out at the same time. Pulling the guide wire back through the needle's bevel could result in the guide wire being cut by the bevel of the needle. This is most likely to occur when the guide wire is curved at the tip or when the guide wire is already bent from trying to advance the guide wire.
- Step 3:
- Once the guide wire has been advanced to an appropriate length, continue to hold onto the guide wire and retract the needle from the puncture site.
- Without loosing hold of the guide wire, remove the needle from the guide wire and place the needle in a secure location to prevent a needle stick.
- Important: Never let go of the guide wire as there have been cases of the wire advancing completely into the vessel and requiring surgical removal.
- Step 4:
- If placing a larger catheter or Cordis, enlargement of the insertion site is needed using a #11 blade scalpel
- It is recommended that the back of the blade slide down and along the guide wire enough to create a larger track but without hitting the blood vessel.
- Note: Some clinicians avoid this because of a theoretical concern that the blade could cut the guide wire. To our knowledge there are no case reports or studies published to prove that this risk actually occurs. If done properly this should not happen.
- Step 5:
- While still holding onto the guide wire, place the distal aspect of the IV catheter over the tip of the guide wire and advance the catheter until the guide wire comes out of the IV catheter and then advance the catheter into the vessel while still holding onto the guide wire.
- Step 6:
- Once the catheter is in the vessel, gently pull the guide wire out.
- Check placement of the IV catheter by placing a syringe to the end of the catheter and pulling back on the plunger to verify blood return and then flush all ports with normal saline.
- Secure the IV catheter in place.
- Apply occulsive dressing and bio path (if required).
- When appropriate, obtain radiographic imaging to verify placement of the catheter.
- EBM Focused Topic: Chlorhexidine vs Betadine Skin Preparation for Invasive Procedure and Risk of Infection
- Physical Exam: Allen's Test
Steps
Other EBM Consult Related Content
MESH Terms & Keywords
|
|---|
|